Fundamentals of Trail Braking
ANATOMY OF TRAIL BRAKING
This is just a quick look at the basics of a trail braking for a standard 90° turn. The “How To” techniques will be covered in the book “Encyclopedia of High-Performance Motorcycle Riding Techniques.” This is one of those topics, I will disagreed with the majority popular theories about braking techniques.
Diagram A. If you google “Trail Braking” on the web you will see a lot of posts on the topic. A chart, similar to this one, will often show up. They are well-drawn and clearly shows the "Popular" theory, being presented.
This shows an acceptable technique for braking while street riding or even some track days. But still falls a little short of aggressive trail braking used for competitive road racing.

It illustrates the theory that during trial braking into the turn, the brake applied pressure is continually decreased from the Turning Point to the Apex. It looks easy to understand and even sounds “logical.”
Unfortunately, there is one common unseen misconception, that I have seen repeatedly, in the basic foundation of this theory. The current popular theory, of the changes in braking pressure during the trail braking process is based on a misconception of the change in lean angle entering the turn. Just for clarification, it is true, the more you are leaned over, from cornering speed, the less traction you will have for braking, so brake pressures must be reduced as your lean angle increases.
The common misbelief is that, the lean angle is, gradually, and continually increased through the entire entrance of the turn and only reaching full lean at or just before the apex of the turn.
Diagram B. The relative width of the lines represents the amount of lean angle from this popular scenario. The wider the line, the higher the lean angle. It shows the common theory of the change from straight up to full lean angle in BLUE. Notice, the change in lean angle uses the entrance to get to full lean angle at or near the Apex. The RED section shows where the bike is stable at full lean angle. Whereas the GREEN arch shows the lean going from full to straight up. This exit line will be discussed in other writings and videos.
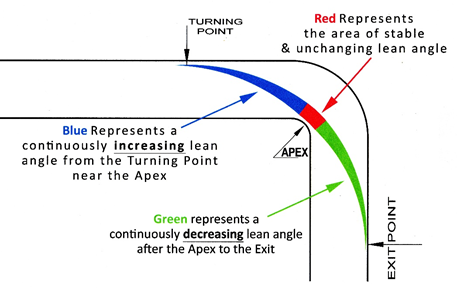
If the change in lean angle took place as shown here, then the “Popular Pattern” of trail braking pressures would be appropriate. In such as a street ride in the mountains, canyons, maybe track-days.
For an actual road racing application, this is actually an inaccurate representation of how and when a race bike leans over which results in the popular pattern of braking being less than optimal.
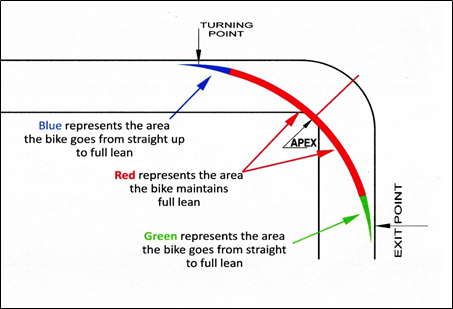
In a true expert level racing scenario, most racers will go from straight up to full lean in a relatively short distance. The transition will smoothly take place in a matter, of several feet, and in a fraction of a second. The next diagram shows the pattern of change in lean angle in a true racing scenario.
Diagram C. The BLUE arc shows the estimated short distance that to go from straight up to full lean. The RED arc shows the area the bike is at a constant full lean. The GREEN arc shows where the bike back to straight up.
 With the bike in a stable full lean angle, a different pattern of brake pressure will be more effective. Because the bike in a stable lean, the available traction for braking is also stable. The brake pressure won’t need to be, continuously, reduced for the majority of the entrance. The racer can now maintain a reduced, but consistent pressure.
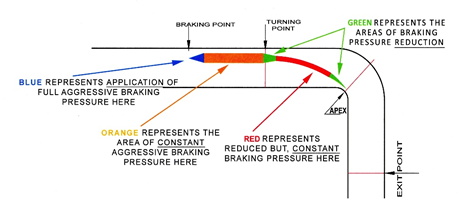
Diagram D. This shows a more complex braking pattern. This pattern takes advantage of the longer stable lean angle distance.
The Blue section show were the brakes go from 0 to to full braking pressure.
The ORANGE section shows maintaining full braking pressure while still straight up.
The first GREEN section shows where the brake pressure is reduced as the bike changes lean angles goes from 0 to full.
The RED section shows where the brake pressure is constant but reduced.
The second GREEN section shows where the brakes are smoothly released.
Trail braking is the “ultimate step” in achieving, aggressive, late, and efficient overall braking. The concept that I teach about braking is,
- The more aggressive you’re braking, the shorter the distance will take to slow the bike down for the corner.
- If you can brake for a shorter distance while on the straight, you can brake later, and still get slowed down for the turn.
- If you can brake later you can stay on the gas longer!
- If you can use the entrance of the turn to finish slowing down even more, then you once again brake later and stay on the gas longer even!
- If you stay on the gas longer your lap time will improve.
To have a good understanding of trail braking we need to be familiar with four points.
- Goal of trail braking
- Change in speeds
- Change in lean angle
- Change in applied brake pressure
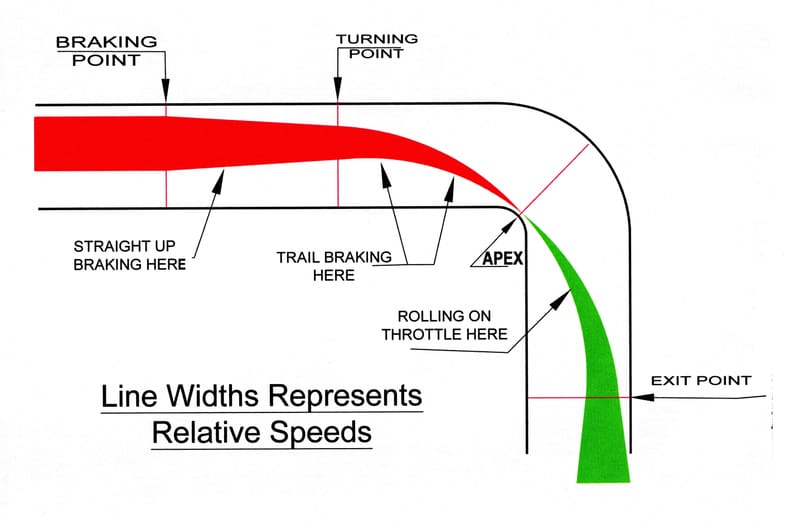
Diagram E. This final diagram shows the relative change in speeds through the entire turn both trail braking (RED) and accelerating (GREEN). The width of the lines represents the relative changes in the speed of the bike through the turn.

The trick is to use all of the traction but not cross that very fine line between control and a face plant. As with everything else, there is a mental tool or feedback the rider can use to check his traction level. Now, this is a subtle feedback, and it varies from bike to bike and tire to tire but, it is there, If you are smooth and flowing in your techniques.
This feedback will come through the handlebars. This feedback shows up with the “Braking Stand Up” phenomenon. This, will be addressed, in more detail, in another article. ”Braking Stand Up and How to Use It”